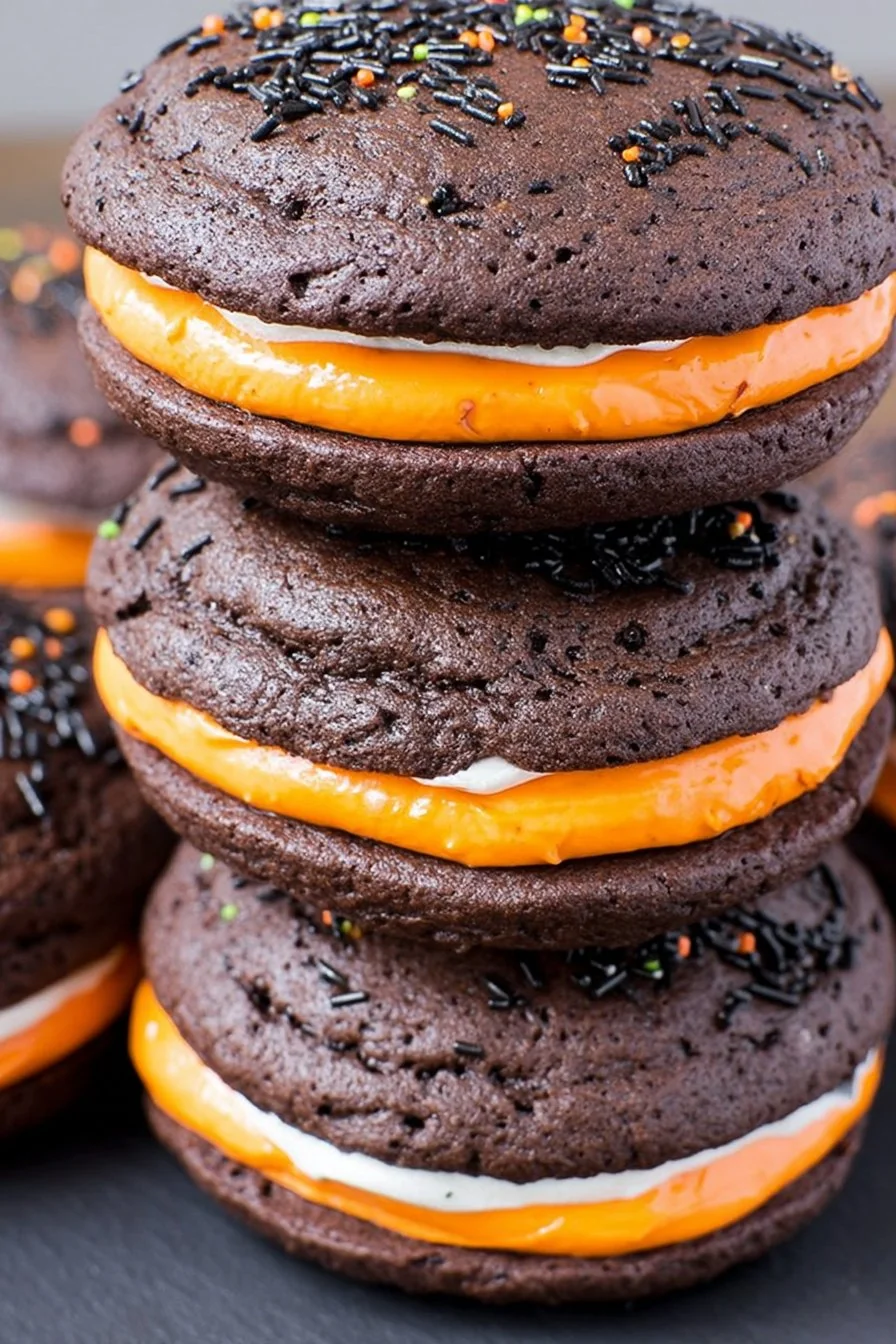
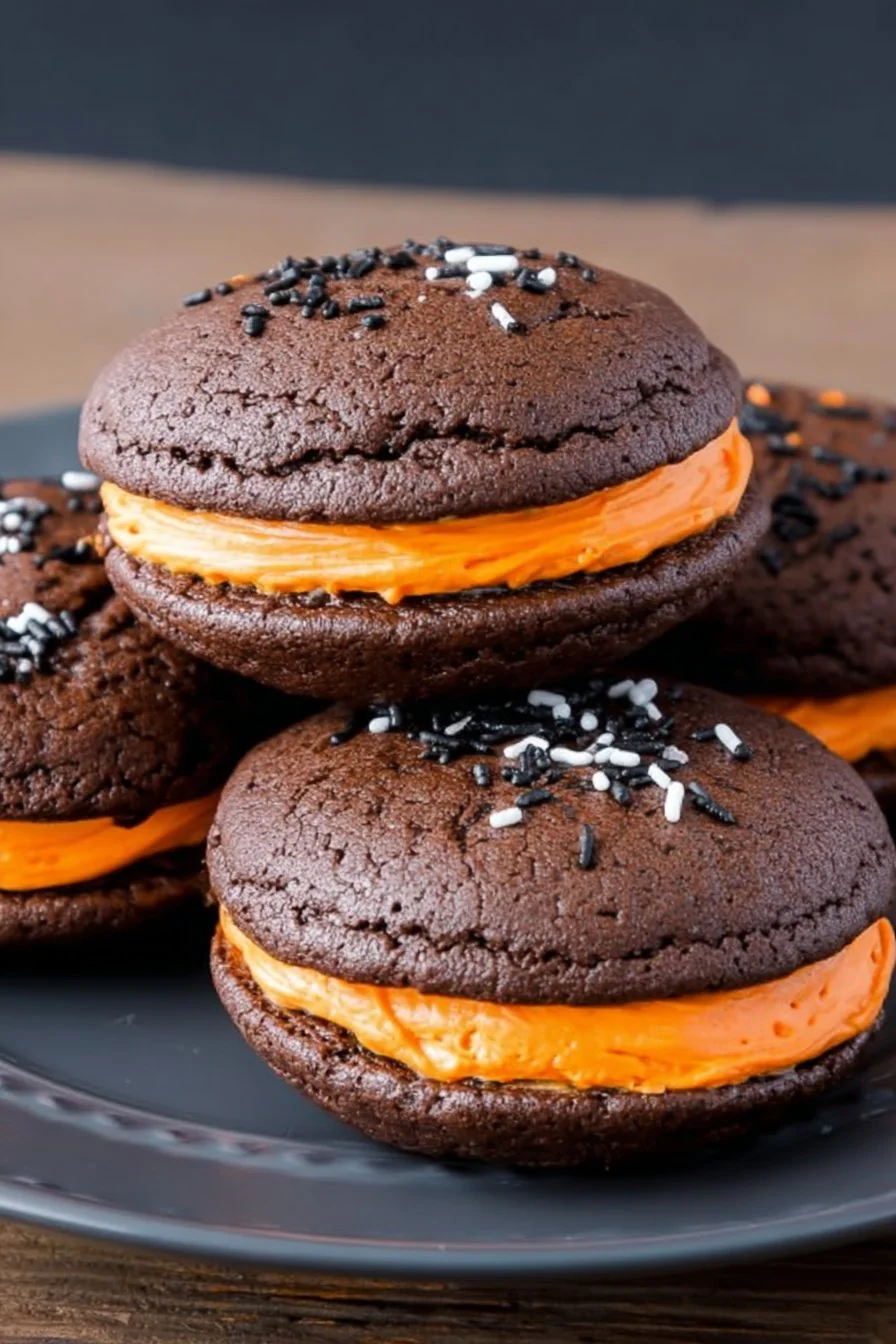
Get ready to fall head over heels for these absolutely dreamy Halloween Whoopie Pies! Imagine rich, fudgy chocolate cakes with a pillowy-soft bite, all sandwiched around a creamy, marshmallow filling that’s tinted with vibrant Halloween hues.
These festive treats aren’t just eye-catchingâ€â€they’re super easy to make, seriously fun to decorate, and guaranteed to steal the show at any spooky gathering or autumn party. The flavor is irresistible, the texture is melt-in-your-mouth, and the colorful filling brings instant smiles.
Perfect for Halloween parties, school events, or simply treating your family to something special. This recipe is a longtime family favorite in our house, and I know it’ll become one in yours too. Grab your sprinkles and let’s whip up the best Halloween treat you’ll make all season!
Why You'll Love This Recipe
- Super festive and customizable for Halloween parties or fall gatherings
- Soft, cakey chocolate cookies with creamy, fluffy filling
- Easy to make in under an hourâ€â€even with little helpers
- Perfect for making ahead and transporting to events
Key Ingredients for Halloween Whoopie Pies
See recipe card below for full list of measurements, ingredients, and instructions.Cocoa Powder
Cocoa powder is what gives these whoopie pies their decadent, deep chocolate flavor and classic dark color. For the richest taste, opt for unsweetened natural cocoa powder. Dutch-processed cocoa will work too, but may give a slightly different flavor profile. Make sure to sift the cocoa so your cookies bake up smooth and lump-free.
Buttermilk
Buttermilk keeps the cookies ultra-moist and tender with just the right hint of tang. If you don’t have buttermilk on hand, make a quick substitute by adding 1 tablespoon of lemon juice or white vinegar to 1 cup of milk and letting it sit for 5 minutes. You can also use plain yogurt thinned with a splash of milk.
Marshmallow Creme
This is the fluffy secret to that irresistible, cloud-like filling! Marshmallow creme (or fluff) makes the center sweet, light, and delightfully sticky. Look for it in jars near the baking aisle. If you can’t find it, you can blend mini marshmallows with a little butter over low heat as a substitute.
Food Coloring
Food coloring transforms the filling into bright orange, green, or purpleâ€â€absolutely perfect for Halloween! Gel food colors give the most vibrant results without thinning out your filling. You can go classic orange and black, or get creative with any spooky color combo you love.
Festive Sprinkles
Halloween-themed sprinkles add a fun, crunchy finish and really make these whoopie pies pop on the dessert table. Use black, orange, purple, or even candy eyeballs! Feel free to skip or swap based on your own festive flair.
Instructions for Halloween Whoopie Pies
See recipe card below for full list of measurements, ingredients, and instructions.Preheat and Prep
Start by preheating your oven to 350 °F (175 °C). Line two baking sheets with parchment paper or silicone matsâ€â€this helps prevent sticking and keeps your cookies perfectly shaped.
Mix the Dry Ingredients
In a medium bowl, whisk together the flour, cocoa powder, baking soda, baking powder, and salt. Set aside. This step ensures your cookies rise evenly and have a deep chocolatey flavor in every bite.
Cream Butter and Sugar
In a large mixing bowl, beat together the softened butter and brown sugar until light and fluffy, about 2 minutes. Add the egg and vanilla, and beat until well combined.
Combine Wet and Dry Mixtures
Add the dry ingredients to the butter mixture in three parts, alternating with the buttermilk. Begin and end with the dry mixture, and mix just until combinedâ€â€don’t overmix or your cookies may turn out tough.
Scoop and Bake
Use a small ice cream scoop or tablespoon to drop 1 ½-inch rounds of batter onto your prepared baking sheets, spacing them about 2 inches apart. Bake for 10-12 minutes, until the cookies are puffed and spring back when gently pressed. Let them cool on the tray for 5 minutes before transferring to a wire rack.
Make the Marshmallow Filling
While the cookies cool, prepare the filling. In a clean bowl, beat together the softened butter and marshmallow creme until smooth. Gradually add the powdered sugar and vanilla, beating until fluffy. Divide the filling and tint with food coloring as desired.
Assemble and Decorate
Once your cookies are completely cool, spread or pipe about 2 tablespoons of colored filling on the flat side of half the cookies. Top with another cookie to create a sandwich. Roll the edges in festive sprinkles for extra Halloween flair.
Recipe Variations
Candy Corn Filling
Give your whoopie pies a candy corn vibe by dividing the marshmallow filling into three bowls and coloring each orange, yellow, and white. Pipe the colors in stripes for a fun, layered look that screams Halloween!
Gluten-Free Option
Swap the all-purpose flour for a 1:1 gluten-free baking flour blend. The cookies will remain soft and deliciousâ€â€no one will even guess they’re gluten-free!
Vegan Twist
For a plant-based version, use a vegan butter alternative and certified vegan marshmallow creme. Replace the egg with a flax egg (1 tablespoon flaxseed meal + 2.5 tablespoons water, mixed and set for 5 minutes).
Spiced Chocolate Cookies
Add ½ teaspoon ground cinnamon and a pinch of nutmeg to your dry ingredients. The subtle spice makes these whoopie pies taste extra cozy and autumnal.
Serving Suggestions
Halloween Whoopie Pies are fantastic on their own, but they’re even better alongside a cup of hot cocoa or apple cider. For a party platter, serve with bowls of candy corn, caramel popcorn, or sliced apples. Add a spooky touch by garnishing your platter with gummy worms or candy eyeballs for kids!
Storage and Reheating
Store assembled whoopie pies in an airtight container at room temperature for up to 2 days, or in the fridge for up to 5 days. For best texture, let chilled pies sit at room temp for 15-20 minutes before serving. You can freeze the unfilled cookies for up to 2 months; thaw, fill, and decorate just before enjoying. Avoid freezing assembled pies, as the filling can get sticky.
Frequently Asked Questions About Halloween Whoopie Pies (FAQ)
Q: Can I make the whoopie pies ahead of time?A: Yes! You can bake the cookies a day or two in advance and store them tightly covered. Fill and decorate them the day you plan to serve for best freshness.
Q: Can I use store-bought frosting instead of marshmallow filling?A: Absolutelyâ€â€store-bought vanilla or cream cheese frosting works in a pinch. The texture will be a bit thicker, but still delicious.
Q: How do I get perfectly round whoopie pies?A: Use a small cookie scoop or pipe the batter in circles for uniform size. Chilling the batter for 15 minutes before baking can also help them hold their shape.
These Halloween Whoopie Pies are the ultimate treat for spooky seasonâ€â€soft, creamy, colorful, and bursting with fun! I hope you’ll give them a try for your next gathering. If you bake a batch, let me know how they turn out by leaving a comment or rating below. Happy haunting and baking!
Ingredients
- 2 cups all-purpose flour
- ½ cup unsweetened cocoa powder
- 1 ¼ teaspoons baking soda
- ½ teaspoon baking powder
- ½ teaspoon salt
- 1 cup light brown sugar, packed
- ½ cup unsalted butter, softened
- 1 large egg
- 1 teaspoon vanilla extract
- 1 cup buttermilk
- 1 jar (7 oz) marshmallow creme (marshmallow fluff)
- ½ cup unsalted butter, softened (for filling)
- 1 ¼ cups powdered sugar
- 1 teaspoon vanilla extract (for filling)
- Food coloring (orange, green, purple, etc.)
- Halloween sprinkles (optional)
Instructions
-
1Preheat oven to 350 °F (175 °C). Line two baking sheets with parchment paper.
-
2In a medium bowl, whisk together flour, cocoa powder, baking soda, baking powder, and salt.
-
3In a large bowl, beat butter and brown sugar until light and creamy. Add egg and vanilla; mix until smooth.
-
4Gradually add dry ingredients to the wet mixture, alternating with buttermilk. Mix until just combined.
-
5Drop rounded tablespoons of batter onto prepared sheets, spacing 2 inches apart.
-
6Bake for 10-12 minutes or until tops spring back when touched. Cool 5 minutes, then transfer to a wire rack.
-
7For the filling, beat together marshmallow creme and softened butter until smooth. Add powdered sugar and vanilla, beating until fluffy. Divide and color as desired.
-
8Spread or pipe filling onto half the cooled cookies. Top with remaining cookies. Roll edges in sprinkles, if using.
Approximate Information for One Serving
Nutrition Disclaimers
Number of total servings shown is approximate. Actual number of servings will depend on your preferred portion sizes.
Nutritional values shown are general guidelines and reflect information for 1 serving using the ingredients listed, not including any optional ingredients. Actual macros may vary slightly depending on specific brands and types of ingredients used.
Did you make this recipe?
Please consider Pinning it!!