Instant Pot Corned Beef marries the centuries-old tradition of corned beef preparation with modern cooking convenience. Corned beef, traditionally enjoyed during St. Patrick’s Day festivities and beloved for its rich flavor and tender texture, has roots tracing back to Ireland and has since been embraced internationally, particularly in America.
Previously, this dish required hours of careful simmering to achieve the ideal melt-in-your-mouth tenderness. Thanks to the Instant Pot, you can now enjoy classic corned beef with cabbage and hearty vegetables in a fraction of the time, without sacrificing flavor or succulence.
This recipe infuses the brisket with aromatic spices, garlic, and onions, then steams it to perfection alongside savory carrots, creamy baby potatoes, and crisp cabbage wedges. The result is a meal that delights with robust flavors and a vibrant presentation.
Whether you are celebrating a holiday or craving comforting one-pot fare, Instant Pot Corned Beef is a reliable and delicious choice. It’s perfect for family dinners, meal prepping, or impressing your guests with a classic that never goes out of style.
The recipe is easy enough for beginners, but the resulting dish is satisfying enough for seasoned home cooks. Let’s unlock the secret to perfectly cooked corned beef, made easy and accessible with today’s kitchen technology.
Ingredients
- 1 (3-4 lb) corned beef brisket, with spice packet
- 4 cups water or low-sodium beef broth
- 1 large onion, quartered
- 4 cloves garlic, peeled and smashed
- 2 bay leaves
- 1 teaspoon black peppercorns
- 3 large carrots, cut into chunks
- 1 lb baby potatoes, halved
- 1 small head green cabbage, cut into wedges
- Optional: 1 tablespoon pickling spice if no spice packet is included
Instructions
- Take the corned beef brisket out of its packaging and rinse it thoroughly under cold running water to remove any excess brine and surface salt. Gently pat the meat dry using paper towels. This simple step ensures your finished dish isn’t overly salty and allows the other flavors to shine.
- Position the brisket in the Instant Pot insert, making sure the fat cap faces upward. This allows the fat to naturally tenderize and flavor the meat as it cooks. Sprinkle the provided spice packet evenly over the beef. If your brisket doesn’t include a spice packet, use one tablespoon of pickling spice. Ensure the spices are distributed for optimal flavor.
- Arrange the quartered onion, peeled and smashed garlic cloves, bay leaves, and black peppercorns around the brisket. This aromatic bed infuses the meat with pronounced yet balanced undertones as it simmers under pressure.
- Carefully pour four cups of water or low-sodium beef broth into the Instant Pot. Add enough liquid so the brisket is mostly submerged but avoid exceeding the pot’s maximum fill line. The choice of broth or water can further enhance the depth of flavor.
- Secure the lid on the Instant Pot and turn the vent to the Sealing position. Select the Manual or Pressure Cook setting and program it for 85 minutes at High Pressure. This extended cooking time is essential for breaking down the connective tissues and yielding perfectly tender, juicy corned beef.
- Once the cooking cycle has finished, allow the pressure to naturally release for 15 minutes to gently finish the meat. Afterward, cautiously switch the valve to Quick Release to vent any remaining pressure. Remove the lid once the pin drops and it is safe to do so.
- Nestle the carrots, halved baby potatoes, and cabbage wedges around the cooked corned beef. These vegetables absorb the flavorful broth and reach just the right texture with additional steaming.
- Secure the lid again, ensure the valve is set to Sealing, and cook on High Pressure for another 5 minutes. This brief additional time ensures the vegetables become tender without overcooking.
- Do a quick release as soon as the cooking cycle ends to stop the vegetables from becoming mushy. Carefully lift out the vegetables and place them on a serving platter. Reserve some of the flavorful cooking liquid to drizzle over the dish when serving.
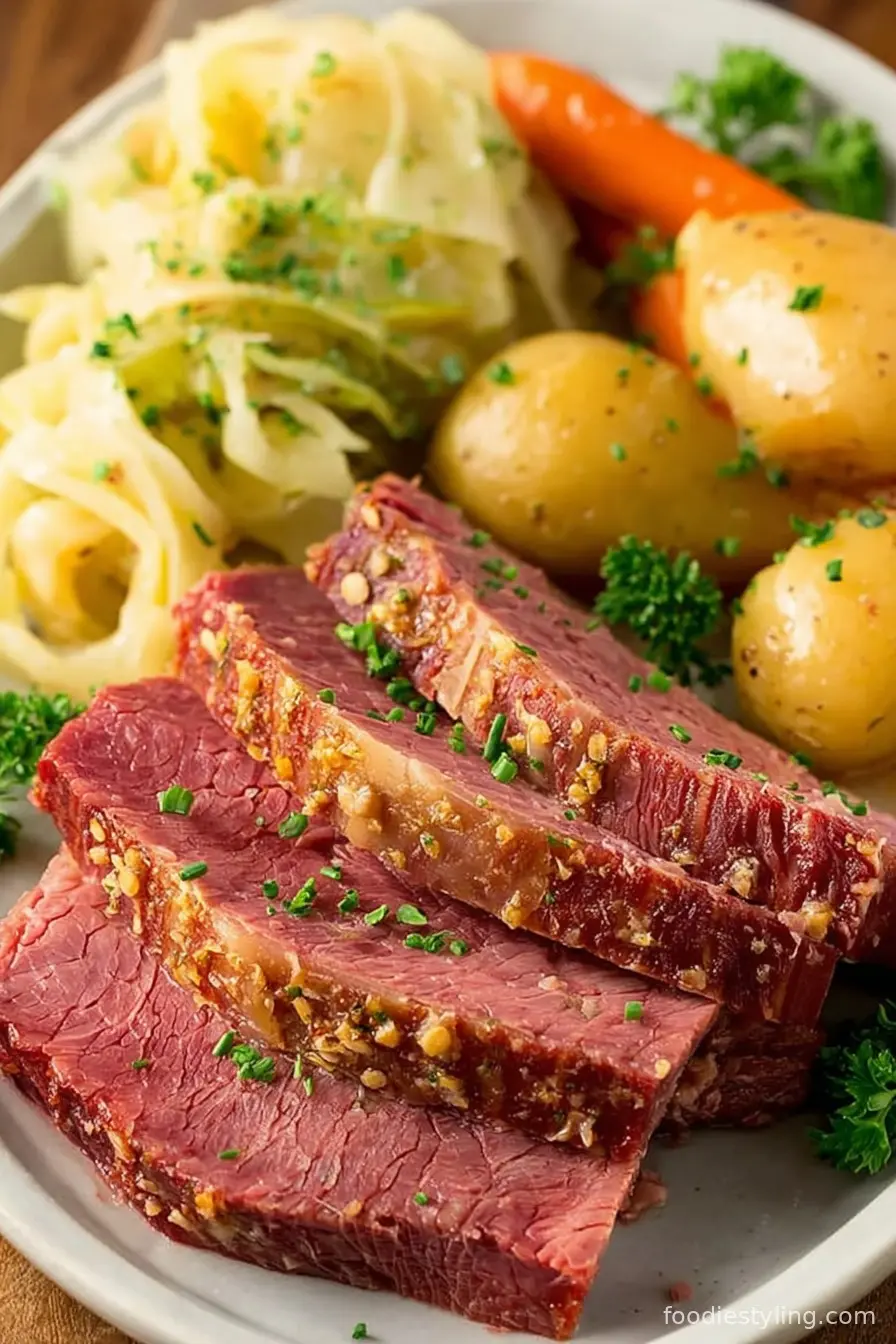
- Using a sharp carving knife, slice the corned beef against the grain into even portions. Arrange the brisket alongside the vegetables and serve with a generous scoop of the cooked broth for moisture and flavor. Enjoy your homemade Instant Pot Corned Beef!
Nutritional Information
A typical serving of Instant Pot Corned Beef with vegetables provides a balanced nutritional profile, making it both a hearty and satisfying main course. Each serving (based on the recipe divided into 8 portions) delivers approximately 350-400 calories, with a combination of protein, complex carbohydrates, and healthy fats.
The corned beef brisket offers a good source of protein for muscle repair and satisfaction, while the potatoes and carrots supply dietary fiber, potassium, and vitamin C. Cabbage is rich in antioxidants and vitamins K and C, supporting immune health and digestion.
The cooking technique using the Instant Pot allows for less added fat than traditional methods, as the meat cooks in its own juices and requires minimal oil. Opting for low-sodium broth can keep the sodium content in check, especially since corned beef is inherently salty due to the curing process.
Overall, this dish offers a filling meal packed with nutrients, making it a wholesome option for family dinners or festive gatherings.

Wine and Beverage Pairings
Instant Pot Corned Beef pairs wonderfully with a variety of beverages. Traditionalists often lean toward a cold pint of Irish stout such as Guinness to complement the salty, savory notes of the brisket.
For wine enthusiasts, opt for a medium-bodied red like Pinot Noir, which is light enough to balance the richness of the meat but robust enough to enhance the spice profile. If you prefer white wine, a crisp Riesling or Sauvignon Blanc provides a refreshing contrast.
For non-alcoholic options, sparkling apple cider or a homemade lemonade with a hint of mint offers a zesty balance to the dish’s hearty flavors.
Cooking Tips and Variations
Achieving the very best Instant Pot Corned Beef is as much about small details as it is about following the steps. Always rinse and pat dry your brisket to remove excess surface salt; this prevents an overpowering saltiness in the finished dish.
If you have the luxury of time, allow the corned beef to rest for 10-15 minutes after pressure cooking but before slicing—this helps retain its juices. For more pronounced flavor, you can add a tablespoon of apple cider vinegar or a splash of beer to the cooking liquid.
If you prefer a more intensely seasoned brisket, consider doubling the spice packet or add extra peppercorns, mustard seeds, or coriander. To avoid mushy vegetables, set them aside and cook separately if your Instant Pot is on the smaller side.
Feel free to substitute the baby potatoes with quartered Yukon Golds or red potatoes for variety. For a gluten-free meal, ensure your corned beef and broth are certified gluten-free. To make meal prep easier, chop all your vegetables in advance and refrigerate until ready for cooking.
Leftover corned beef makes fantastic sandwiches, hash, or even a hearty soup, so don’t hesitate to double your recipe for next-day meals.

Serving Suggestions
When presenting your Instant Pot Corned Beef, arrange the sliced beef on a large platter and surround it with vibrant chunks of carrots, potatoes, and cabbage wedges. Ladle some of the warm, seasoned broth over both the meat and vegetables to maximize juiciness and flavor.
Serve with whole grain mustard or horseradish sauce on the side for an extra kick. This meal is ideal for family gatherings and holiday dinners, especially St. Patrick’s Day celebrations.
Complement the centerpiece with a loaf of warm rye or soda bread as a side, plus crisp pickles or a tart apple slaw to cut through the richness. Remember to slice the beef against the grain for the most tender bite.
For larger parties, consider doubling the recipe and serving buffet-style so guests can help themselves. Leftover corned beef makes an excellent filling for sandwiches, salads, or breakfast hash, so be sure to save any extras for next-day meals.
This savory, one-pot meal is sure to become a beloved staple in your home, perfect for both casual weeknights and special occasions.
Health Benefits
Instant Pot Corned Beef, when prepared and enjoyed in moderation, can be part of a wholesome diet. Beef brisket is a great source of high-quality protein, iron, zinc, and B vitamins, which contribute to muscle health, energy metabolism, and immune function.
The inclusion of carrots, potatoes, and cabbage brings valuable dietary fiber and micronutrients such as vitamin A, potassium, and antioxidants, supporting digestive and cardiovascular health.
Since corned beef is cured with salt, it does contain higher sodium levels; opting for low-sodium broth and thoroughly rinsing the brisket before cooking can help manage sodium intake.
The Instant Pot method minimizes the need for added fats, allowing this classic dish to deliver hearty satisfaction with less grease compared to traditional simmering or roasting methods. Including a balance of vegetables makes this meal both nourishing and satisfying, supporting sustained energy and overall wellness.
Frequently Asked Questions
Yes, you can cook corned beef from frozen in the Instant Pot. Simply add an extra 10 minutes to the pressure cooking time and note that the brisket will take longer to reach pressure. Always check for tenderness before serving.
While the spice packet provides classic corned beef flavor, you can substitute with 1 tablespoon of pickling spice if it is not included. Feel free to add extra peppercorns or a bay leaf for more aroma.
Absolutely! Instant Pot Corned Beef reheats very well. Store the sliced meat and vegetables with some of the braising liquid in an airtight container in the refrigerator for up to 4 days.
If you prefer firmer vegetables, try cooking them separately in the Instant Pot after the meat is done, or reduce the pressure cook time for the vegetables to 3 minutes instead of 5.
Store leftovers in an airtight container in the refrigerator for up to 4 days. Reheat gently on the stove with a splash of broth to restore moisture and prevent the meat from drying out.
Instant Pot Corned Beef is a modern take on a time-honored classic, bringing together brisket, hearty root vegetables, and cabbage in a single, effortless pot. The Instant Pot streamlines the process, making it easy to serve up juicy, flavorful corned beef in under two hours and with minimal effort. This recipe is perfect for holiday feasts or satisfying family meals, offering impressive taste and memorable presentation. With a few tips for best results, plenty of room for customization, and unbeatable convenience, this Instant Pot Corned Beef is sure to become a staple in your kitchen. Enjoy the vibrant flavors and tender textures, and savor the tradition with every bite.
Ingredients
- 1 (3-4 lb) corned beef brisket, with spice packet
- 4 cups water or low-sodium beef broth
- 1 large onion, quartered
- 4 cloves garlic, peeled and smashed
- 2 bay leaves
- 1 teaspoon black peppercorns
- 3 large carrots, cut into chunks
- 1 lb baby potatoes, halved
- 1 small head green cabbage, cut into wedges
- Optional: 1 tablespoon pickling spice if no spice packet is included
Instructions
-
1Take the corned beef brisket out of its packaging and rinse it thoroughly under cold running water to remove any excess brine and surface salt. Gently pat the meat dry using paper towels. This simple step ensures your finished dish isn’t overly salty and allows the other flavors to shine.
-
2Position the brisket in the Instant Pot insert, making sure the fat cap faces upward. This allows the fat to naturally tenderize and flavor the meat as it cooks. Sprinkle the provided spice packet evenly over the beef. If your brisket doesn’t include a spice packet, use one tablespoon of pickling spice. Ensure the spices are distributed for optimal flavor.
-
3Arrange the quartered onion, peeled and smashed garlic cloves, bay leaves, and black peppercorns around the brisket. This aromatic bed infuses the meat with pronounced yet balanced undertones as it simmers under pressure.
-
4Carefully pour four cups of water or low-sodium beef broth into the Instant Pot. Add enough liquid so the brisket is mostly submerged but avoid exceeding the pot’s maximum fill line. The choice of broth or water can further enhance the depth of flavor.
-
5Secure the lid on the Instant Pot and turn the vent to the Sealing position. Select the Manual or Pressure Cook setting and program it for 85 minutes at High Pressure. This extended cooking time is essential for breaking down the connective tissues and yielding perfectly tender, juicy corned beef.
-
6Once the cooking cycle has finished, allow the pressure to naturally release for 15 minutes to gently finish the meat. Afterward, cautiously switch the valve to Quick Release to vent any remaining pressure. Remove the lid once the pin drops and it is safe to do so.
-
7Nestle the carrots, halved baby potatoes, and cabbage wedges around the cooked corned beef. These vegetables absorb the flavorful broth and reach just the right texture with additional steaming.
-
8Secure the lid again, ensure the valve is set to Sealing, and cook on High Pressure for another 5 minutes. This brief additional time ensures the vegetables become tender without overcooking.
-
9Do a quick release as soon as the cooking cycle ends to stop the vegetables from becoming mushy. Carefully lift out the vegetables and place them on a serving platter. Reserve some of the flavorful cooking liquid to drizzle over the dish when serving.
-
10Using a sharp carving knife, slice the corned beef against the grain into even portions. Arrange the brisket alongside the vegetables and serve with a generous scoop of the cooked broth for moisture and flavor. Enjoy your homemade Instant Pot Corned Beef!
Approximate Information for One Serving
Nutrition Disclaimers
Number of total servings shown is approximate. Actual number of servings will depend on your preferred portion sizes.
Nutritional values shown are general guidelines and reflect information for 1 serving using the ingredients listed, not including any optional ingredients. Actual macros may vary slightly depending on specific brands and types of ingredients used.
To determine the weight of one serving, prepare the recipe as instructed. Weigh the finished recipe, then divide the weight of the finished recipe (not including the weight of the container the food is in) by the desired number of servings. Result will be the weight of one serving.
Did you make this recipe?
Please consider Pinning it!